1. 프로젝트 생성
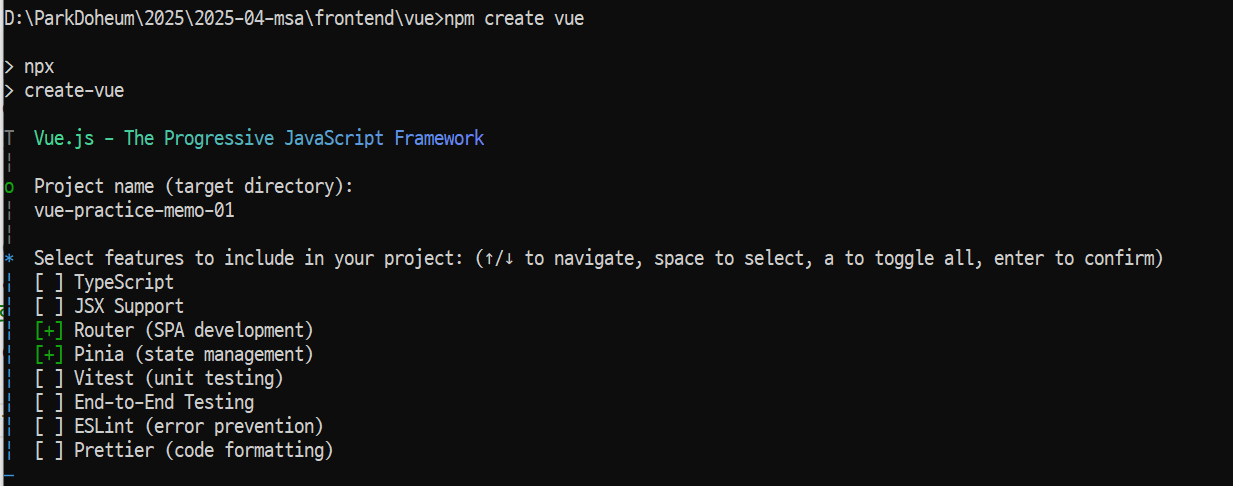
CMD에서 프로젝트를 생성할 경로로 이동 후 아래 명령어 실행
npm create vue
Project name: 프로젝트명
Select features to include in you project: 화살표로 이동 가능, 추가하고 싶은 라이브러리는 스페이스로 체크

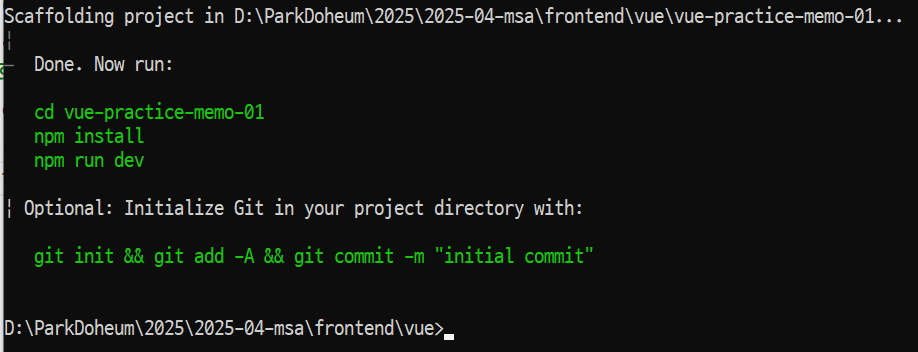
위 화면이 나타나면 Visual Studio Code (이하 VSC) 에서 폴더 열기로 프로젝트 폴더를 오픈한다.
2. 설치
2.1 라이브러리 인스톨
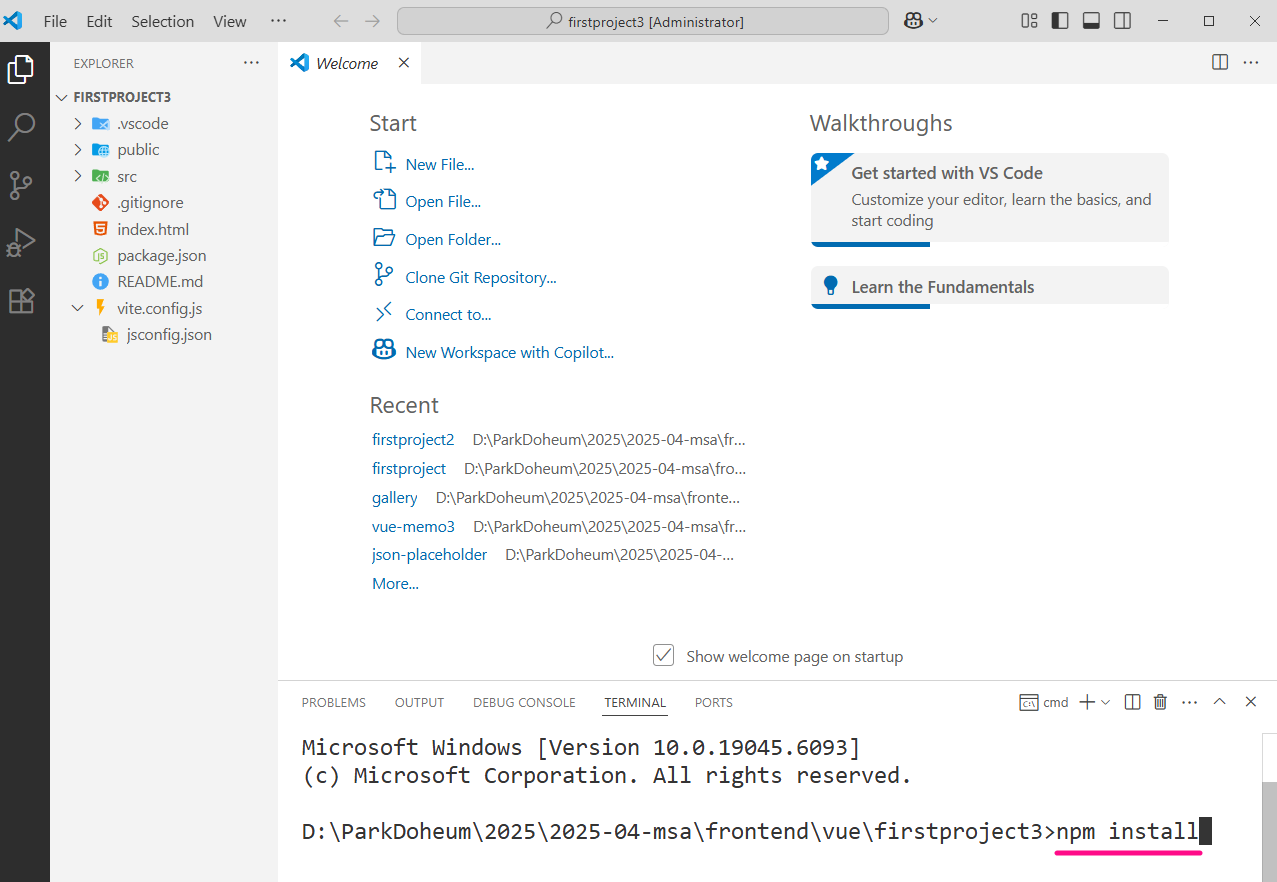
VSC에서 터미널 창을 활성화 한 후 아래 명령어를 입력하여 package.json에 입력되어있는 라이브러리를 다운 받는다.
> npm install
2.2 부트스트랩
프로젝트 폴더 아래 index.html 파일을 열어 <head> 태그 사이에 아래 내용을 추가
<link rel="stylesheet" href="https://cdnjs.cloudflare.com/ajax/libs/bootstrap/5.3.7/css/bootstrap.min.css" integrity="sha512-fw7f+TcMjTb7bpbLJZlP8g2Y4XcCyFZW8uy8HsRZsH/SwbMw0plKHFHr99DN3l04VsYNwvzicUX/6qurvIxbxw==" crossorigin="anonymous" referrerpolicy="no-referrer" /><!DOCTYPE html>
<html lang="">
<head>
<meta charset="UTF-8">
<link rel="icon" href="/favicon.ico">
<meta name="viewport" content="width=device-width, initial-scale=1.0">
<link rel="stylesheet" href="https://cdnjs.cloudflare.com/ajax/libs/bootstrap/5.3.7/css/bootstrap.min.css"
integrity="sha512-fw7f+TcMjTb7bpbLJZlP8g2Y4XcCyFZW8uy8HsRZsH/SwbMw0plKHFHr99DN3l04VsYNwvzicUX/6qurvIxbxw=="
crossorigin="anonymous" referrerpolicy="no-referrer" />
<title>Vite App</title>
</head>
<body>
<div id="app"></div>
<script type="module" src="/src/main.js"></script>
</body>
</html>
2.3 Sass
VSC 메뉴 View > Terminal 선택 ( 단축키 Ctrl + ` )

터미널이 나타나면 아래 명령을 실행하여 sass 라이브러리 설치
npm i -D sass설치가 성공하면 ./package.json 파일에 devDependencides 에 sass 내용이 추가된다. 우측 숫자는 버전을 의미하며 버전은 설치 시점에 따라 달라질 수 있습니다.
//설치 전
"devDependencies": {
    "@vitejs/plugin-vue": "^5.2.3",
    "vite": "^6.2.4",
    "vite-plugin-vue-devtools": "^7.7.2"
}


// 설치 후
"devDependencies": {
    "@vitejs/plugin-vue": "^5.2.3",
    "sass": "^1.89.2",
    "vite": "^6.2.4",
    "vite-plugin-vue-devtools": "^7.7.2"
}
2.4 Axios
터미널에서 아래 명령을 실행하여 axios 라이브러리 설치
npm i axios설치가 성공하면 ./package.json 파일에 dependencides 에 axios 내용이 추가된다. 우측 숫자는 버전을 의미하며 버전은 설치 시점에 따라 달라질 수 있습니다.
// 설치 전
"dependencies": {
  "pinia": "^3.0.1",
  "vue": "^3.5.13",
  "vue-router": "^4.5.0"
}


// 설치 후
"dependencies": {
  "axios": "^1.10.0",
  "pinia": "^3.0.1",
  "vue": "^3.5.13",
  "vue-router": "^4.5.0"
}
3. 세팅
3.1 App.vue
./src/App.vue 파일을 열어 아래 내용으로 변경한다.
<script setup>
</script>
<template>
<div class="app">
<div class="container py-4">
<header class="pb-4 mb-4 border-bottom">
<router-link to="/" class="text-dark text-decoration-none">
<b class="fs-4">Memo Application</b>
</router-link>
</header>
<main>
<router-view />
</main>
<footer class="pt-4 mt-4 border-top">
© 2024. Memo. All rights reserved.
</footer>
</div>
</div>
</template>
<style lang="scss" scoped>
.app .container { max-width: 576px; }
</style>
3.2 파일/폴더 삭제
./src/assets 폴더 자체 삭제
./src/components 폴더 아래 모든 파일 및 폴더 삭제 (폴더 아래 아무것도 없는 상태)
./src/views 폴더 아래 파일 2개 모두 삭제 (폴더 아래 아무것도 없는 상태)
3.3 파일 생성
./src/views 폴더 아래에 Form.vue, Home.vue 파일 생성
// Form.vue

<script setup>
import { reactive } from 'vue';
const state = reactive({
    memo: {
        id: 0,
        title: '',
        content: '',
        createdAt: ''
    }
});
</script>

<template>
  <form class="detail" @submit.prevent="submit">
    <div class="mb-3" v-if="state.memo.createdAt">
      등록일시: {{ state.memo.createdAt }}
    </div>
    <div class="mb-3">
      <label for="title" class="form-label">제목</label>
      <input type="text" id="title" class="form-control p-3" v-model="state.memo.title" />
    </div>
    <div class="mb-3">
      <label for="content" class="form-label">내용</label>
      <textarea id="content" class="form-control p-3" v-model="state.memo.content"></textarea>
    </div>
    <button type="submit" class="btn btn-primary w-100 py-3">저장</button>
  </form>
</template>

<style scoped>
</style>
// Home.vue

<script setup>
import { reactive } from 'vue';

const memos = [];

const state = reactive({
  memos: [],
});
</script>

<template>
  <div class="memo-list">
  	<router-link to="/memos/add" class="add btn btn-light">
      + 추가하기
    </router-link>
    <router-link v-for="m in state.memos" :to="`/memos/${m.id}`" class="item" :key="m.id">
      <div class="d-flex pt-3">
        <div class="pb-3 mb-0 w-100">
          <div class="d-flex justify-content-between">
            <b>{{ m.title }}</b>
            <div>
              <span role="button" @click.prevent="remove(m.id)">삭제</span>
            </div>
          </div>
          <div class="mt-2">{{ m.content }}</div>
        </div>
      </div>
    </router-link>
  </div>
</template>

<style lang="scss" scoped>
.memo-list {
  .item {
    background-color: #f8f9fa;
    border: 1px solid #eee;
    display: block;
    color: #000;
    text-decoration: none;
    padding: 20px 30px;
    margin: 15px 0;

    &:hover {
      border-color: #aaa;
    }
  }
}

.add {
  display: block;
  padding: 25px;
  border: 1px solid #eee;
}
</style>
./src/services 폴더 생성 후 폴더 아래에 HttpService.js 파일 생성 후 아래 내용을 작성
// HttpService.js

import axios from 'axios';
axios.defaults.baseURL = 'http://localhost:8080/api';

class HttpService {

}

export default new HttpService();
3.4 라우터 파일 수정
./src/router/index.js 파일을 열어 아래 내용으로 변경
import { createRouter, createWebHistory } from 'vue-router'

const router = createRouter({
  history: createWebHistory(import.meta.env.BASE_URL),
  routes: [
    {
      path: '/',
      name: 'home',
      component: () => import('@/views/Home.vue'),
    },
  ],
})

export default router
3.5 main.js 파일 수정
./src/main.js 파일을 열어 " import './assets/main.css' " 내용을 삭제하여 아래와 같도록 수정한다.
import { createApp } from 'vue'
import { createPinia } from 'pinia'

import App from './App.vue'
import router from './router'

const app = createApp(App)

app.use(createPinia())
app.use(router)

app.mount('#app')
4. 다운로드
위 작업이 모든 끝난 프로젝트 다운로드
압축을 해제하고 (압축파일 안에 폴더 존재) 폴더명을 수정 한 후 CMD에서
해당 폴더 경로까지 이동 후 " npm i " 명령어 실행하여 라이브러리를 모두 설치한다.